Dealing with Auto Layout
Solving Auto Layout issues is always a hassle; we run our application expecting all our constraints work correctly to find a massive block of Auto Layout error logs on the console.
Interface Builder is of great help when creating layouts visually since it throws warnings and errors when the constraints are faulty, although our layout might not always follow the visuals on IB. Our screen UI might change depending on different elements such as network request responses or locally stored data. Moreover, we might have screens that are built entirely from server-side information, sizes, colors, shapes, everything!

Get up to $2500 signing bonus applying as Software Developer
It seems like there’s no other way than to deal with that chunk of Auto Layout error log. Well, there are more straightforward ways, for starters, there’s WTFAutoLayout (WTF stands for ‘Why The Failure’) which turns our cryptic error message into a beautiful visual representation of the issue.
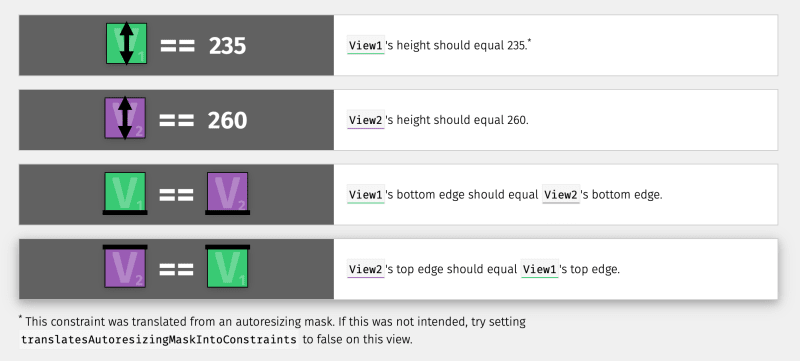
Thanks John Patrick Morgan (@jpmmusic) for creating this.
This method is already a significant leap forward when understanding constraint issues, but it still means you need to find the conflicting constraint, write a fix, rerun your app, navigate to the desired screen and hope that:
- Your screen looks as it should
- The current layout matches the one with errors
- The Auto Layout error message is gone
Keep in mind that your current app state might not always be there, perhaps when you rerun your app the server response changed and the content that was generating issues is not there any longer, for example, excessive long labels on cells.
View Debugger + LLDB to the rescue
Xcode’s View Debugger is a fantastic tool for understanding how UI’s are composed and debugging Auto Layout issues. If you never used the View Debugger I recommend you take a look at this Ray Wenderlich’s Screencast on the topic since this is post does not dive into what the View Debugger is and how to use it.
One of the best features of the View Debugger is the Layout Issues warnings. This functionality saves us much time when trying to understand which view/constraint is causing Auto Layout to complain.
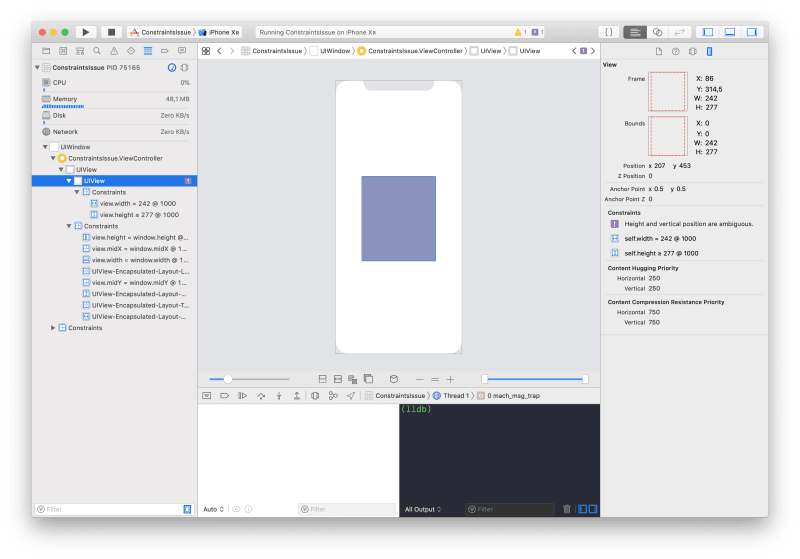
Single view layout with ambiguous constraint
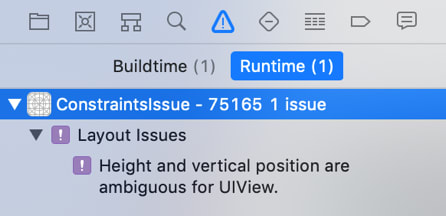
Layout Issues list on the Issue Navigator
We’re now able to jump straight into the conflicting view with a human-readable description of the error: “Height and vertical position are ambiguous”. Now is time to dive into LLDB. We’ll implement the core concepts presented in 2018 WWDC talk Advanced Debugging with Xcode and LLDB. I highly recommend you watch it.
We’ll take a few steps to try and resolve our constraint issue without rerunning our app and without reloading our current screen. This approach saves a lot of time and it is a life-saver if we’re not able to replicate the layout issue.
Here’s our plan to do this:
- Launch the View Debugger.
- Deactivate the conflicting constraint
- Apply constraint fix
- Update our layout from LLDB
- Check that the Layout Issue warning is gone
- Profit
W’ll use a super simple single-view case, but you can apply the same concepts for complex screens. This is our demo ViewController class:
class ViewController: UIViewController {
    override func viewDidLoad() {
        super.viewDidLoad()
        let colorView = UIView()
        colorView.translatesAutoresizingMaskIntoConstraints = false
        colorView.backgroundColor = .lightGray
        view.addSubview(colorView)
        NSLayoutConstraint.activate([
            colorView.heightAnchor.constraint(greaterThanOrEqualToConstant: 277),
            colorView.widthAnchor.constraint(equalToConstant: 242),
            colorView.centerXAnchor.constraint(equalTo: view.centerXAnchor),
            colorView.centerYAnchor.constraint(equalTo: view.centerYAnchor)
        ])
    }
}
With the app running and the simulator on foreground ⌥ + click on the View Debugger icon:
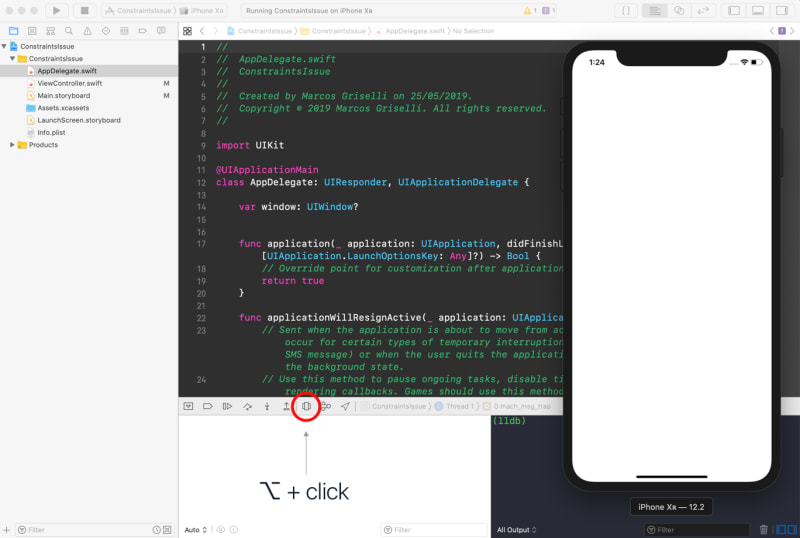
Notice how the simulator is the active app while Xcode sits in the background
Using ⌥ + click while the simulator is on foreground opens the View Debugger and keeps the simulator app running. This trick is a crucial part of our method since it will let us check the UI updates live.
This action opens the View Debugger and keeps your app in a “breakpoint” state. Copy the conflicting constraint, in this case view.height >= 277 @ 1000, with ⌘ C and move to LLDB.
You might need to import UIKit before any LLDB step so run this command:
expr @import UIKit
Using copy under this circumstances copies the memory address with the type cast to the clipboard with this format: ((NSLayoutConstraint *)0x600002a01810. With this we’re now able to deactivate the constraint with e ((NSLayoutConstraint *)0x600002a01810).active = false;
If you want to see the current state of your layout after deactivating the constraint, run
e [CATransaction flush]on LLDB to see the changes reflected on the simulator (this is possible because the simulator is kept active in foreground).
Now we can apply the constraint we expect will solve this issue. We’ll have to copy our view from the View Debugger as we did with the constraint and add an explicit constraint: e [[((UIView *)0x7f925d407850) heightAnchor] constraintEqualToConstant: 277].active = YES;
We’ll run e [CATransaction flush]; again to make sure our layout is correct and click on the play/pause button beside the ‘activate all breakpoints’ one to continue running your app on the simulator.
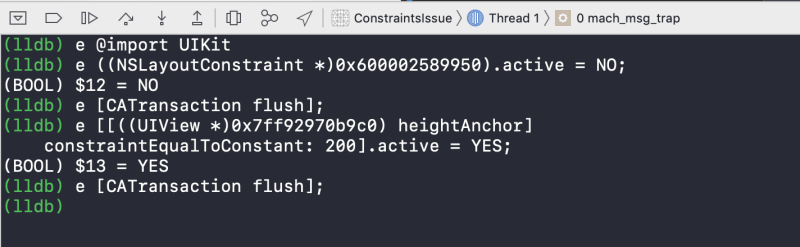
Instructions sent to LLDB
To make sure our new constraint doesn’t bring any new layout issue, we’ll open the View Debugger again and the system will re-check for new Auto Layout warnings, we can check that we’re now warning-free.
That’s it, with those simple steps we were able to find our conflicting constraint, test a fix and evaluate that the Auto Layout warnings are gone without rerunning our app.
LLDB supports aliases and scripting so I suggest you take a look at that to make your debugging process even faster. You can start here.
NOTE: While this approach can be done only by using Xcode and the simulator, there are other alternatives that avoid dealing with casting and LLDB. They present UIs that look very similar to IB where you can edit multiple properties and values and see the changes on the simulator on real-time! I recommend you take a look at them to see if they fit your needs:
- Reveal by Itty Bitty Apps
- Sherlock by Inspired Code
For any suggestion, question or discussion please use this tweet
Related Posts
Replicating the iOS App Store Search tab
Lately I’ve been working with UISearchController for a friends open source app and decided to share the approach we took to replicate the App Store search functionality. The idea was... Keep reading